Groups
Groups provide a way to organize your Assets in nearly any manner you wish. Groups can be used to run Reports, assign to an Alert, view on the map, and as a filter in the Power BI Dashboards.

Opening the Groups window will display a list of all existing Groups on your account. Groups are created using existing Assets and Users of your account. You must be an administrator of your Temeda account to create groups.
In the Group window, a filter can be used to find the Group you wish to work with quickly. Each Group has a description for easier reference as the number of Assets, Users, and Groups grows. Two actions can be taken for each Group in the Group window: edit or delete.
To create a new Group, click the Add Group button on the top right side of the Group window.
Add a Group
The Add Group window has fields to enter in the Group Name and Description. Groups also allow you to select the Assets and Users you want to assign to each Group. Once the Group information has been completed, click the Save button to complete the action.
Dynamic Groups
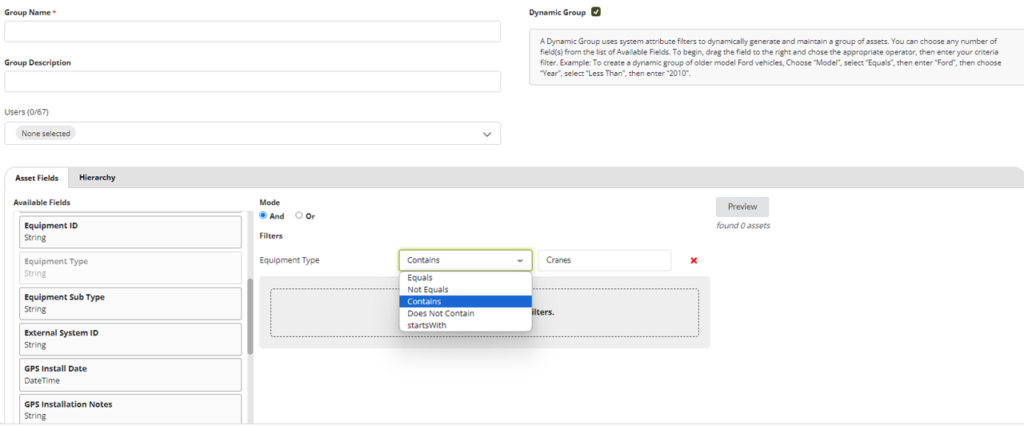
Dynamic Groups allow Assets to be added and removed from groups automatically using details about the Asset. Check the box next to the Dynamic Group button to create a dynamic group. Then, choose from the Available Fields which Asset Details you would like to use to create the rules to manage the Group. Left-click and hold on the field name, drag and drop it into the Filters section, select the operator, and enter the filter criteria. Use the preview button to ensure the desired Assets are assigned to the Group.

Note: Assets cannot be manually added to a dynamic group. The Asset details must meet the dynamic group criteria. Our platform syncs Dynamic Groups automatically every 15 minutes. After Asset details are updated, allow time for the Asset to be added automatically or edit and save the Group to sync it immediately.
Edit a Group
To edit a Group, click the pencil icon on the right side of the Groups modal window.
Each of the existing fields can be modified. Group Name is a required field and must contain a unique value for your account for the changes to be saved. The bottom of the Edit a Group window will show who created the Group, when they created it, who most recently modified it, and when it was most recently modified.
Export Groups
You can Export Groups as comma-separated values by clicking the Export Data button on the Groups modal window.
